Saturday, March 9, 2013

Mexican? Goulash?

My "go to" Meal

Everyone has to have a "go to" meal.  It is the meal for which you know you always have the ingredients in the cupboard and can whip up anytime.  My go to meal is Mexican goulash.

Just how it became Mexican goulash is slightly confusing.  It's based on a dish my Nana used to make at every family gathering.  She called it Tamale pie... only as far as I ever remember, it was never a pie... Somewhere along the line, we weren't able to get the same brand of canned tamales that my Nana used, so my mom kind of switched up the recipe and started calling it Mexican goulash.   I'm not even sure what the technical definition of a "goulash" is, and I'm sure my friends in Mexico would deny that it's truly "Mexican".  Alas, this dish by any other name is still tasty :)

Forgot to put the can of tomatoes in the picture!!
Dump the following ingredients into a crockpot or 2qt. casserole dish:

3 cans of beans
             (kidney, pinto, black)
1 can corn
1 can diced tomatoes (chunky salsa also works in a pinch)
1 can small whole olives


Now here's where you make it your own.
I like to add some kind of meat, but I have family members who prefer it vegetarian, so sometimes we leave the meat out.
 I have added:

  • canned tamales-cut up
  • browned hamburger 
  • browned ground chicken 
  • browned ground turkey
  • canned shredded chicken 
  • cooked chicken breasts-cut up 
  • leftover taco meat...

I would have to say my favorite is ground turkey.

I make my own taco seasoning.
 Add the seasoning to whatever meat you choose...or if going veggie, add the seasoning directly into the crockpot or dish.


1 pkt taco seasoning 
              I make my own, but I've never written down a recipe. Here are my ingredients:
             (minced onion, chili powder, cumin, paprika, garlic powder, and salt)
1 package shredded cheddar cheese

My homemade taco seasoning
in an old parmesan
cheese container.


If you're preparing this in the crockpot, don't add the cheese until ready to serve. Set crockpot to low for all day, or to high for a few hours.

If using the oven and a casserole dish then mix in the cheddar cheese and leave a little to sprinkle on the top. Bake at 350 for 30-40 minutes.


Condiments for Mexican Goulash
  • sour cream
  • hot sauce
  • jalapenos

We also like to have some sort of bread with our Mexican Goulash... here are our choices:
  • cornbread
  • tortillas
  • Fritos
  • Tortilla chips
Mexican Goulash.
Enjoy.


Wednesday, March 6, 2013

PF Chang's Chicken Lettuce Wraps

My version of PF Chang's Chicken Lettuce Wraps


I had never been to a PF Chang's restaurant until this past summer on our trip out to Colorado.  I have no idea if a PF Chang even exists in Iowa...Someone should get on that.

Anyway, my mother in law ordered the chicken lettuce wraps and let me have a taste.  She's real sweet like that. :)  I loved it.  I don't even remember what I ordered.  Seriously, I couldn't tell you.  But I do remember those lettuce wraps.  So I googled copycat recipes and I found this one HERE.  As with any recipe, I'm never content to just do as I'm told, so I have tweaked this one into my own version, but many of the ingredients are still the same.

Go ahead and start your rice first... I absolutely love Basamati rice.  It is the only rice I ever use.  So. yummy.

Start off with about a pound of chopped chicken.  You can do this a couple of different ways.  I prefer to just buy ground chicken.  No fuss, no messy chopping... it's great.  I have also done it with partially thawed chicken breasts.  I say "partially thawed" because this makes for the easiest way to chop the chicken into pretty little cubes.

Cook the minced chicken over medium heat in a large skillet.  Mince half of a small onion.  The recipe calls for much more, but I have found it to be too much for my family.
chopped chicken breasts and half of a small onion, minced.
A plethora of ingredients including finely
chopped water chestnuts 
 The most difficult part of this recipe is just the uniqueness of the ingredients.  I mean... what the heck is Hoisin sauce?  I've never had that in my pantry, but now, it's a staple.  It's like China in a bottle.  Tasty.

Add to the skillet:
2 TBS minced garlic (I buy the squeezable kind)
1 TBS soy sauce
1/4 c. hoisin sauce
2 tsp. minced ginger (again, squeezable rocks)
1 TBS Rice wine vinegar
(you can also use red wine vinegar)


When the rice is just about finished and needing to be drained... add the last two ingredients to the chicken:

1 can water chestnuts finely chopped 
2 tsp. sesame seed oil

 Now, many recipes will call for Bib lettuce, and if we had a grocery store that actually carried it, I might use it.  But I have found that Romaine lettuce leaves do nicely.  Cut off the core and the worn tips, separate the leaves and give them a good hosing down.  The smaller leaves in the center, I find, to be the best ones.
Chicken, Basamati Rice, and Romaine Lettuce leaves.

So that's it.  Fresh and tasty. Enjoy.


Wednesday, February 6, 2013

Seth's Hat

A very quick little crochet project 
that I think most beginners will have no trouble with.


Oh my.  Isn't he a cutie?
This is Seth.  Seth is almost 2 and he has been coming to my house to play and nap a few days a week for the last year and a half.  He calls me Lah-lah, and I adore him.

So this little hat was made for Seth.  I think he wears it well, don't you?


Some beanie basics: 

Look closely to see the seam.
Beanie hats are crocheted in rounds as opposed to being crocheted in rows like you would for a blanket.  The hat is made from the crown down, working in a spiral-like fashion.  It starts as a circle with stitches made into the circle and with each round the stitch count is increased.  For example, if I were to do 8 stitches in my circle, then in general, I would increase each round by 8 stitches.  If I started with 6 stitches in my circle, I'd increase each round by 6... get the idea?  The number of increase rounds you'll do for your beanie will depend on how large or small you want the hat.  To get the size hat you want... whether for infant, teen, or adult, depends not just on the number of increase rounds or initial stitches, but it also depends on the size hook you use and the weight of your chosen yarn.  It may take a few tries, and a few frogs, before you get comfortable with sizing a beanie.  Worst thing that can happen is you'll know how to make a size for someone else ;)

Another thing to keep in mind is whether you want to begin each round with a chain up (1 chain for single crochet, 2 chains for half double crochet or double crochet, 3 chains for double crochet...etc.) and then end with a slip stitch into the initial chain to finish the round... OR forgo the chaining up and just use a stitch marker to remind you where each completed row ends and just crochet in rounds.  The benefit of this second method is that there will be no annoying little seam that wanders through your work.  I used the first method and if you look closely on the picture down at the bottom left of the hat, you will see a slight seam.  I made a second hat (for my husband) which I used the second method and there was no seam.

Okay, so for Seth's hat I used a "G" hook  (4.25mm) and Caron Simply Soft yarn in Gray. **

** I love Simply Soft for hats... because, well, it's soft.  It takes some practice using this yarn though, if I'm being honest.  It has a tendency to split and can be frustrating for the beginner.  Red Heart yarn isn't quite as nice, in fact I find it a bit scratchy, but it is VERY easy for beginners to work with.  Plus it is about the cheapest yarn out there and you can get it conveniently at Walmart.  Caron Simply Soft is also stocked at Walmart. Also, the beginner will want to use a light colored yarn for the first attempt. Using dark yarn makes it difficult to see the stitches.


Abbreviations:
ML           Magic Loop
Rnd           Round
dc             Double Crochet
ss              Slip Stitch
st              Stitch
ch             Chain
fpdc          Front Post Double Crochet
bpdc         Back Post Double Crochet

To start my circle, I use a Magic Loop.  This is a technique that I am so glad I learned, even though it was quite awkward at the beginning.  There are other methods, but I think the ML is worth learning.  Here is a tutorial for learning it.  Magic Loop Tutorial


Rnd 1: 10 dc into ML
Rnd 2:  ch 2, dc into next st, 2dc into each st around, ss into top of ch2 (20dc)
Rnd 3:  Repeat round 2
Rnd 4:  ch 2 (will counts as the final stitch in the round), dc in next st, 2dc, [dc, 2dc]* Repeat around, ending with a final dc next to ch2 counting as the final 2dc in the pattern.
Rnd 5:  ch 2 (final stitch), dc, dc, 2dc, [dc, dc, 2dc]* repeat around, ending with final dc next to ch2 as the final 2dc in the pattern.

The alternating fpdc/bpdc makes a
"ribbed" effect that I really liked.
This would be the end of the increasing rounds if you were making the size hat that Seth is wearing for a toddler.  If a larger hat is desired, continue adding increasing rounds.  For ex. [dc, dc, dc, 2dc] then [dc, dc, dc, dc, 2dc] and so on until you reach the right size.  For adults (we have large heads in my family) I will usually go up to 6 or 7 dc's then the 2dc.  Don't worry if it's too big, slouchy is "in" ;)

Pattern Continued:

Rnd 6-13:  dc in each stitch, ss to top of ch2.
Rnd 14:  ch 2,[ fpdc, bpdc] around, ss into top of ch 2.
 Here is a tutorial on how to do the front post double crochet and the back post double crochet.    
Rnd 15-17: repeat Rnd 14, fasten off and weave in ends.


Okay, here's my disclaimer.  I am not a great pattern writer.  I'm sure there are mistakes and unclear parts to this pattern.  If you have any questions or would like to have something made clearer, I beg you to ask.  I am not sensitive about having my mistakes pointed out. :) Thanks.  If anyone actually makes this beanie.. I would LOVE LOVE LOVE to see your finished work. Send me a link or find me on ravelry @ Iowaycrochet.  Thanks!!


The video Tutorials that I have recommended are from Teresa Richardson.  Subscribe to her youtube here:
Crochet Geek

Friday, February 1, 2013

Cast Iron Cookie

Skillet Chocolate Chip Cookie.
The original recipe can be found here.  I have doubled it in order to work with my 10in skillet.
It should also work well with a 12 inch skillet.  

Preheat your oven to 350 degrees.
Melt 2 sticks of butter in a 10 inch cast iron skillet over medium heat.
Add 1 cup each of granulated sugar and brown sugar. Add 2 tsp. vanilla.  Mix until smooth.
Take off heat and cool for at least 5 minutes.  
Adding eggs to hot sugars will cause the eggs to begin to cook, and we don't want that!

Add two eggs and whisk until completely combined with the sugar mixture.
In a separate bowl combine 3 c. flour, 1 tsp baking soda, and 1/2 tsp. kosher salt.
CAREFULLY stir flour mixture into egg mixture.  I did this in three small steps.


Stir in 2 cups of your favorite chips.
I did bittersweet chocolate and white chocolate.

Bake at 350 for 35-40 minutes.
Edges should be golden and center should be soft.

Enjoy!


Saturday, October 20, 2012

Making Decisions

Making decisions is not my forte.  I'm fairly indecisive... not because I don't have a preference or an opinion...I have plenty of those.  I'm indecisive because I'm afraid of criticism. I'm afraid of making someone unhappy with the choices I've made, thus making them unhappy with me.  I'm like this because I, myself, am an extremely critical person. I walk into a room and immediately notice all the things wrong in the room.  While most people can see this as a downfall... and I would agree, I have learned that God can take any negative character trait and use it for His good.  And so, although I am a critical person, that same criticism in the hands of God makes me someone who is pretty darn good at surmising a situation, predicting the potential pitfalls, and ultimately avoiding a lot of anguish.

So how does an indecisive, critical person turn into a decisive, discerning  person?  Only through Christ.

First, being in God's Word, I started understanding the sin in my own thoughts.  I also began to replace those thoughts with the Truth I found in Scripture.

Here's an example of a real situation:

Every time I went into the bathroom and saw that the toilet paper roll sat empty and hadn't been changed, or that it had been put on backwards... my blood would boil.  I mean, seriously, HOW HARD IS IT??  See the "righteous" anger here?  :::she said dripping with sarcasm:::  Now, to be fair, this is a common, familial problem.  So common, that we laugh about it often in conversations... comedians use it in their routines and sitcoms have capitalized on this annoying scenario.  But I'm no comedian, and I don't live in a sitcom, and the effect that this annoyance was having on me was severe and in no way funny.  I would steam with indignation and anger.  It became a personal attack against ME.  (tip: anytime you become the center of your thoughts, you are more than likely in the wrong).

And then I heard something.  I mean like "those who have ears to hear, let them hear" kind of hearing.  Through a mother's class I was attending, I heard that I was wrong.  I heard that I was hurting the relationships I had with the members of my family.  I heard that I was selfish and quick to anger.  I heard that I wasn't loving my family as God had called me to love them.  I repented.  I asked for help in my thoughts... and I made a decision.**

I made a decision that the next time, and every time after, when the toilet paper roll went unchanged and I noticed it... because I ALWAYS noticed it,  I would view that as a reminder to pray for each member of my family.  Right there, right then.  I made the decision to replace my selfish anger with a selfless act.  At first the prayers were mumbled through tightened teeth... but as I continued in my practice, I found that I actually smiled... like God and I had an inside joke.  Eventually, the anger was gone.  I saw this as nothing less than a miracle.  A miracle of God's grace to me.

I started making other "decisions".
I now pray for each family member as I wash, fold, and iron their clothes.
I thank God for dirty dishes sitting in the sink that represent the health of my children (this continues to be a particularly difficult one for me).

It branched towards others outside of my family.
I decided to slow down my reactions to offensive things people said or did.
I substitute my criticism for reflection and in doing this, I find I am less inwardly focused and more able to see the needs someone else might have.

While I believe my critical eye should always be submissive to God's requests of love and service to my neighbor, I have learned that God can actually take that which has been tainted by sin and restore it to be a benefit to me and those I serve. I'm not just behaving in a less critical manner.  He has made me less critical.

Through our faith in Christ, our "old Adam" is buried. 
And through our faith in Christ our "new Adam" is brought to life.
This is how criticism can become discernment.

Slowly, and not without setbacks, I have become someone who makes decisions... sometimes. ;)

 **When I say that "I made the decision", I mean it only in the sense that farmers "grow" crops.  Truly it is the design of the seed by God that actually causes a plant to grow.  The farmer waters and cares for the crop, but it is still God's work that produces fruit. So, I may move my mouth in prayer, or close it so nothing rude comes out, but it is God who grants the results of peace, patience, goodness, etc. (Just wanted to be clear on that). 

Saturday, October 6, 2012

A Carolina Crochet Project

One thing that happens when you have kids who are enrolled in online classes... you get the opportunity to meet and become friends with some of the most outstanding people.  In the last five years that my kids have been "attending" Veritas Press, we have literally sent our daughter across the country to meet up with her school friends.  Minnesota, Idaho, Tennessee, Pennsylvania, South Carolina... the list goes on.

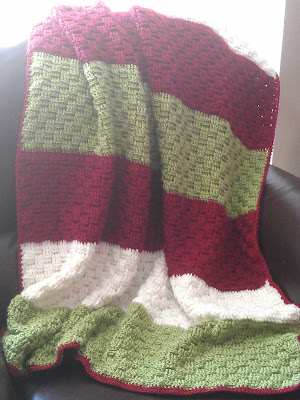
This past summer, Emily was blessed with a trip to Greenville, SC, where she got to see several friends who live in the area.  It is because of this trip that I made this afghan.  I should state... this was my first afghan and I am pretty dern proud of how it turned out!

The stitch is a basket weave that I took from a baby blanket pattern on ravelry.com. Basket Weave Baby Blanket Pattern What I didn't know was how substantial the basket weave is.  This blanket will keep the most chill-prone person toasty warm!  It  devoured yarn at an alarming rate and consequently is quite heavy.  The pattern of stripes was chosen purely from my personal aesthetic preference.  I am not a fan of the zigzag 70's afghan nor the skimpy stripes.  I love the color combination and although the colors might suggest a Christmas theme, I think it could be used anytime. 
     
When changing colors, I stitched an initial row of double crochets across with the new color.  Basically using that last row of the previous color as my "initial chain" and continuing at the beginning of the ravelry pattern.  The green has ten completed basket weaves (20 rows) plus the initial row of dc making the total 21 rows.  Each of the other colors only has 9 completed basket weaves (18 rows) plus the initial dc row making it 19 rows total.  The color pattern went: green, white, red, green, red, white, green.  
The border, I agonized over.  While I wanted to try a different stitch with more of a scalloped edge... I decided that it wouldn't be consistent with the strong presence of the stripes and weave.  In other words, the scalloped edging would be too frilly for the manly stripes. Instead, I went with a simple single crocheted border.  Three rows of sc with the second and third rows stitched only in the back loop to give a little ridge look.  I crocheted three sc in each of the corners as well.  

So this Carolina Crochet Project is my family's thank you to the family who made Emily's trip possible, and so wonderfully memorable.  Thank you! I hope you enjoy using it as much as I enjoyed making it.

~The Pools
Here is the afghan in its new home :)
Looks like it was meant to be there.


Friday, October 5, 2012

Homemade Seed Packets

I do love my garden, and as the growing season for flowers is coming to an end, I am already planning what I'd like to begin with next spring.  I know, it is a sickness ;)

One thing I know I want to do is store all those seeds I have been collecting in something better than the little plastic containers that they are currently in.

It started with my columbines... boy howdy, can those produce some seeds.  And while I love them, I don't want them to reseed everywhere.  I'd like to manage them a little better and even be able to give a few seeds away on occasion.

Then there are the seeds from my poppies, hollyhocks, and forget-me-nots.  Right now, I am collecting seeds from the cleome that are blooming.  In fact the cleome are the reason I went on a search for something in which to send seeds through the mail.

I stayed with a family in Idaho during a recent trip to visit a college with my daughter, and I shared a love for gardening with the lady of the house.  She had never heard of cleome, and so as a thank you, I wanted to send her some seeds from my own garden so that not only would she have the flower, but a reminder of our new friendship as well.  ...But how to send her the seeds?  If only I had a little seed pouch...

And that is how I came to find this little gem.  It is a printable seed packet design.

How cute are these??


I found the site through pinterest and there were several to choose from. This just happened to be my favorite because of it's simplicity.


You can print them on regular printer paper.  I also printed some out on scrapbook paper.

Cut them out and fold the two tabs in.  I used a glue stick on the tabs, then folded in the back of the packet.  Be sure to write on it before you put the seeds in ;)  A little glue goes on the opening tab and then seal it shut.


Now I have a wonderful way to not only store my seeds, but to share them with others. :)