Tuesday, March 29, 2011

Gettin' Crafty

So I've been in a seriously crafty mood lately.  I haven't dragged out my sewing machine for months, but a few days ago I cleaned out and reorganized my sewing cupboard in order to begin a new project.  I'll share what that project was in another blog...   However in my quest to find a pattern for said project, I came across a fantastic blog.  It's called "Make It and Love It".  Soooo many cute and easy projects are listed on this blog.  AND if you're a visual learner like me... TONS of pictures.  It's great!!  I'm not the only one who loves her style and ideas... she's got 13,000 followers!

Today alone I knocked out three really quick and cute crafts.


Child sized neck pillow.  Made with flannel.

picture frame "white" board... pay no attention to our poor dietary habits.

Pig in a blanket... er towel.  Notice the cute little curly tail!

All of these projects and the directions for making them were on her site.  So check out her blog (link above or over in the left column), and get crafty!


Wednesday, March 23, 2011

Pretzels- A Lenten Treat

It was told to me several years ago, that pretzels were a lenten snack.  Although the story claims the shape of the pretzel was invented to resemble monks folding their hands in prayer... there is just no way to substantiate that claim. My comments... Who cares?? If bringing an evergreen into the house during Advent and Christmas can remind you of Christ's everlasting love, why can't a pretzel remind us to pray.. regardless of its historical origin??

At one time the Catholic church restricted the use of lard, eggs and dairy during the Lenten season.  The bread that resulted was very similar to that which we call pretzels.  This more than anything probably contributed to familiarity of pretzels being a "treat" during Lent.
So during Lent, at least once, I make homemade soft bread pretzels. My recipe comes from Alton Brown and can be found here:  Alton Brown's Soft Pretzel Recipe

Because I used my bread machine to make the dough, I am listing the ingredients in the order they should be put into the machine:

1 1/2 c. warm water
2 tsp. kosher salt
2 oz. (1/2 stick) unsalted butter, melted
4 1/2 c. flour
1 TBS sugar
2 tsp. yeast

Set machine for "dough".  This generally takes about an hour and a half.  Your machine might be slightly different.

Later:

Preheat your oven to 450.  Prepare a baking sheet by lining it with parchment paper and brushing it lightly with vegetable oil.

 For the purpose of our Tuesday night ladies' Bible study, I chose to divide the dough into 2 oz. portions.  Normally, I would make larger pretzels and serve them with brats for dinner... that's brAHts.. not brats ;)  But I didn't think the ladies would appreciate the larger portions so late in the evening!

Fill a large pot with 10 cups of water and 2/3 c. baking soda.  Bring to a rolling boil.  Watch it once it boils, the soda will bubble.

Meanwhile:
Roll the dough into long "snakes", then hold up the ends to form a U shape.  Twist the ends and fold back down.  Press the ends down.
Place each shaped pretzel onto the parchment paper.

Drop each pretzel into the boiling soda water for 30 secs. If the pretzels are larger, it's a good idea to do them individually, but because mine are miniature versions, I grouped them into fours.

Using a slotted spatula or spoon rescue the pretzels and return them to the parchment.  Brush them with some  egg wash (1 beaten egg) and sprinkle them with coarse salt.  I used the same kosher salt that I put into the dough at the beginning.

Bake for 12-14 minutes.  The smaller the pretzel, the less time... makes sense.
Pretzels really are best when eaten straight from the oven.  Certainly, they should be eaten the same day... good luck keeping them any longer than that.  They go fast!

Hopefully, these tasty little treats will help us to remember to fold our arms in prayer, and thank God for his many sacrifices this Lenten season.

Wednesday, March 16, 2011

Traditional Irish Soda Bread

Traditionally, I make a loaf of Irish Soda Bread for my family around St. Patrick's day in honor of my Irish heritage...  Besides, who wants to eat the alternative Irish fare... corn beef and cabbage?... blah.  While the Irish aren't particularly known for our culinary prowess, we sure know how to make a mean soda bread.  Okay, we know how to brew beer and bake soda bread to go with it.  How's that?

The recipe I use belonged to my great grandmother, Mary Theresa Forbes Walsh.  She was the mother of my dear Papa, my mother's father.  There isn't anything really interesting about the recipe.  It's pretty basic.  The only ingredient that might add some flare is the addition of caraway seeds.  In my opinion, this "makes" the bread.  However, my immediate family doesn't share that opinion and reluctantly I leave them out... sometimes.

My great grandparents: Joseph and Mary Walsh
My Papa is the cutie all the way to the right. 
Irish Soda Bread
by Mary Theresa Walsh
Preheat oven to 375.  Grease a cast iron skillet and heat it in the oven.  Plump 1c. of raisins in about 2 cups of hot water; set aside.

In a large bowl sift together the following dry ingredients:
4 c. flour
3 tsp. baking powder
1 tsp. salt
1/2 tsp baking soda

Add:
1 1/2 TBS. Caraway seeds
1 c. plumped raisins (drained)
Stir.

Next add 2c. buttermilk and stir until all is moistened.  Don't over stir. 
Carefully take the hot skillet out of the oven and dump the bread dough into the skillet.  Resist the urge to make it smooth and pretty.  I always think of the rocky terrain of Ireland as I leave the bread spikey and lumpy.  These imperfections will give much character to this simple bread.

Bake  40-45 minutes until golden.

Let the bread cool slightly before digging in... if you can wait that long.  This bread is so different from any other that I know and it makes THEE best toast the next morning.  

Irish Soda Bread.
ENJOY and Happy St. Patrick's Day!

Wednesday, March 9, 2011

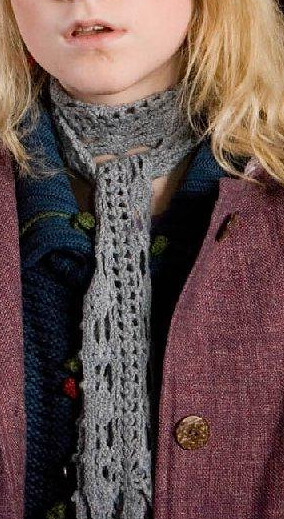
Luna Lovegood Scarf

Well, my latest crochet project was an attempt at using finer thread and a much smaller crochet hook.  I am pleasantly surprised at how well it turned out.  ... Am I allowed to say that?

So, anyone who knows anything about Harry Potter and his cohort of fictional friends will be familiar with the likes of Luna Lovegood.  She is the sweet little hippy-optimist who occasionally shares her simplistic wisdom with Harry, helping him to regain focus within the situation at hand.  She is a good friend, but for the purpose of this blog... we will pay more attention to her wardrobe, specifically a certain scarf she sports in the fifth Harry Potter movie, "Order of the Phoenix".


Contrary to what one might suspect, I did not set out specifically to find a Harry Potter scarf.. in fact, I just wanted to find something delicate and different.  Fortunately for me, some slightly obsessed Harry Potter crocheter figured out how to recreate the Gothic-esque pattern of this scarf and posted it on ravelry.com free for the taking.   http://www.craftster.org/forum/index.php?topic=238536.0


I used a thread that was twisted with a strand of metallic silver in order to get more of a glam look.  My intention was to create a sophisticated accessory for my sister in law.  She lives in Florida and really has no need for a scarf of the practical kind.


So, Laurie, if you're reading this... SURPRISE :)  The scarf is in the mail.  Now, just think about how jealous everyone at Harry Potter World will be the next time you show up in your authentic Luna Lovegood scarf... oh the sheer envy!
Love ya. :)

Wednesday, January 19, 2011

A spring bag on a winter's day.

Made a little crocheted purse yesterday.  The pattern is from Tangled Happy .  I used a super chunky yarn and a K sized hook, so my bag came out more adult sized rather than the small version she has on her blog.  I also opted to line mine.


Here is the bag next to a 2 liter soda bottle so you can get an idea of the size.

I made a liner out of remnant fabric and hand stitched it into the bag.  I doubled the liner, so that you would see the right side of the fabric whether you were looking into the bag or through the holes made from the shells.  I thought about adding a snap, but decided it didn't need it.

The flower is one of my favorite parts.  I used a little bit of water to dampen the flower so it would lay flat.  

Okay, so that is what I did yesterday!  I have a huge list of crochet projects I need to get back to, but this was a nice diversion. :)

.

Monday, December 13, 2010

Wash Day Peach Cobbler

One of the family's favorites. Very easy.

This is just a regular 13x9 for a single recipe.  When I double it,
 I use my Pampered Chef  Rectangular Baker stoneware.
I got this from a cookbook called "Madison County Cookbook; Winterset, Iowa".  This cookbook was given to me by a good friend (Hi Diane!!) nearly...15 years ago... sheesh!  Anyway, I love this old, falling-apart cookbook and this is my favorite recipe in it.

1 (16 oz.) can peach fruit or your choice  (I use my home-canned peaches)
1 C. flour
1 C. sugar
1 C. milk
2 tsp. baking powder
Dash of salt
1 stick margarine (I use butter)


Preheat the oven to 400 degrees.  (350 if making a double batch)
In a medium saucepan over medium heat, cook fruit until boiling.  Set aside.  In a medium mixing bowl combine flour, sugar, milk, baking powder, and salt.  In a 2 quart casserole (If doubling, use a deep 13x9).  Melt margarine (butter) in the microwave then pour into the baking dish.  Pour batter over butter (do not stir).  Add hot fruit (do not stir).  Sprinkle a little more sugar on the top just before baking.  Bake at 400  for 20-30 minutes.  (If doubled bake at 350 for 40-45 minutes.)
Makes 4-6 servings (8-12)

Serve this with some vanilla ice cream or even just some whipped cream.  Trust me, it won't last long!

Tuesday, December 7, 2010

The Mad Hatter

Since about March of this year, I have been consumed with crocheting.  It has come to me so much easier than knitting, which I failed at miserably.  My favorite things to crochet are hats.  Here are a few that I have produced. :)


This has to be my new favorite hat to make for babies and toddlers.  I've made several already.  They take a couple of hours (including flower) and are so simple.  
 The pattern is found here: McKinley's hat
Just scroll all the way down and you'll find two sizes to choose from: Newborn and Toddler.
Using white and lime green Caron Simply Soft yarn


Here is my very own model, Miss Ava, looking extremely sweet in a green version topped with a daisy.


 Caron Simply Soft yarn in lavender.


I've made two of these purple "toddler" versions as well.  This one was given as a birthday gift to a friend's daughter, the other for a niece.
I'd put a link to the flower pattern... if I could remember whose pattern I used.  I think I just went to Youtube and searched for "crochet flower" and followed a tutorial.


Olivia's Tulip hat
Caron Simply Soft: watermelon pink and lime green


The Tulip hat was a fun project.  I made it for my littlest niece, Olivia.  She looks so adorable in it... that is, if she were to keep it on.  This hat can easily be adjusted to create any number of fun versions. Use red yarn instead of pink and you have a strawberry.  Use orange and you have a pumpkin.


Caron Simply Soft Grey
This one I made for my niece, Aloura, for
her 17th birthday.


One of my favorite hats to make is the slouchy puff hat.  I don't even know how many I've made... perhaps 5 or 6?  This hat gets high marks with the teens and preteens.  More than one of my nieces is getting this for Christmas!  SHhhhh....


Red Plymouth Encore DK
Acrylic/Wool
The Phannie is a pattern that I have come to really enjoy making.  
It's a bit more sophisticated than the slouchy hat. In fact the first one I made took me several hours... okay a few days.  I spent 4 hours at a crafting day at church just crocheting and then ripping it out, crocheting and ripping it out.  By the end of the day, I was only one row ahead of where I started.  It was pretty frustrating, but I learned a lot from my mistakes.  Now I can whip one up in an afternoon.   My daughter Emily pleaded to have the first one I made, and quite frankly, she totally owns it.  It looks so cute on her, how could I refuse?  Alas, I did make another for a niece... or two.  
Yes, I have many, many nieces :)  

Nine to be exact.

Which reminds me.. I have a few Christmas presents I need to finish up.