Sunday, May 22, 2011

Blue Bag

So, I decided to attempt the Flower burst bag according to directions.  While I followed them more closely this time, this bag is not without errors... for sure! But it is much closer to the original pattern.  It ended up being shorter than the other one I made, but very cute.

Flower Burst in blue


I also added a simple coin purse to go with the bag.  To make the coin purse, I just chained 17, then starting with the second chain from the hook, I hdc in each chain.  I put a second hdc in the last chain and stitched hdc along the other side of the chain.  When I got to the end and back to my first hdc, I did NOT connect.  I just stitched a hdc in the first hdc.  I continued in a round until the coin purse was the size I wanted.  To make the flap, I switched colors and turned.  I hdc across the back, turned, then stitched two hdc together (decrease).  I did this at the end of the row as well. Continue back and forth being sure to decrease at the beginning and the end of each row until it was the length and shape I wanted: like an stationery envelope.  I realize that if you don't crochet, this last paragraph makes absolutely NO sense... and even if you do crochet... it might not make sense! I never professed to be a pattern maker, that is for sure!


For the embellishments I simply crocheted another flower like the ones on the bag and attached it to the flap of the coin purse.  I added a little loop under the flower to catch the button that I stitched on with thread.  Lining the the coin purse was a sinch. Just fold a rectangular piece of fabric in half and use the purse as pattern.  Stitch the sides and leave the folded edge alone and the open end... open.   Put it in the coin purse and fold over the fabric edges at the top. Stitch along the edges of the fabric to the yarn.  There ya go.

I decided to also line the bag with fabric.  I don't like the idea of my keys, pens, and whatever else poking through between the stitches, and since I was making this for someone, I really wanted it to have a finished look to it.


This material was used in making aprons several years ago.
I'm so glad I keep scraps!!
I wish I could describe how I lined the bag... but even I'm not sure how I did it.  I tried to just think about the shape of the inside.  This bag has a base, so I did make a base and then stitched two other pieces of fabric to the base and to themselves.  This really was just done by trial and error.  It doesn't need to be perfect as it just sits in the bag.  Try not to over think it! Obviously, the important thing is to remember that the printed side of the fabric needs to be seen in the bag.  ;)  I folded over the fabric at the top, pinned it in place and stitched it right to the yarn.  
Another added bit was the "lanyard" type dealie that I crocheted in order to keep the coin purse connected to the bag.  I just chained and stitched single crochets up and down the chain, making a loop at the end.  I fastened a key ring to the end of the lanyard and attached the clip to the coin purse.  


Like I said before, this is a gift.  I made it for my mom in law, Pat.  She'll be over tomorrow and I'll get to give it to her :)

What's the best part about crocheting?

... getting to give the stuff away.

Friday, May 20, 2011

Too Much Chocolate??

Is there even such a thing as "too much chocolate"?? I seriously doubt it.

I came across this recipe for "Almost Too Much Chocolate Cake" online, and I must admit, it hooked me.  I recently made it for a friend's birthday and it really was as good as it looked, but I can hardly say it was "too" much :)

The site I found the recipe on was Make it and Love it.  However, I believe someone else is to be credited as the author/baker.  Either way, this is one recipe that will be repeated in the Pool household.
Find the Recipe HERE

Here is my quest for too much chocolate ;)

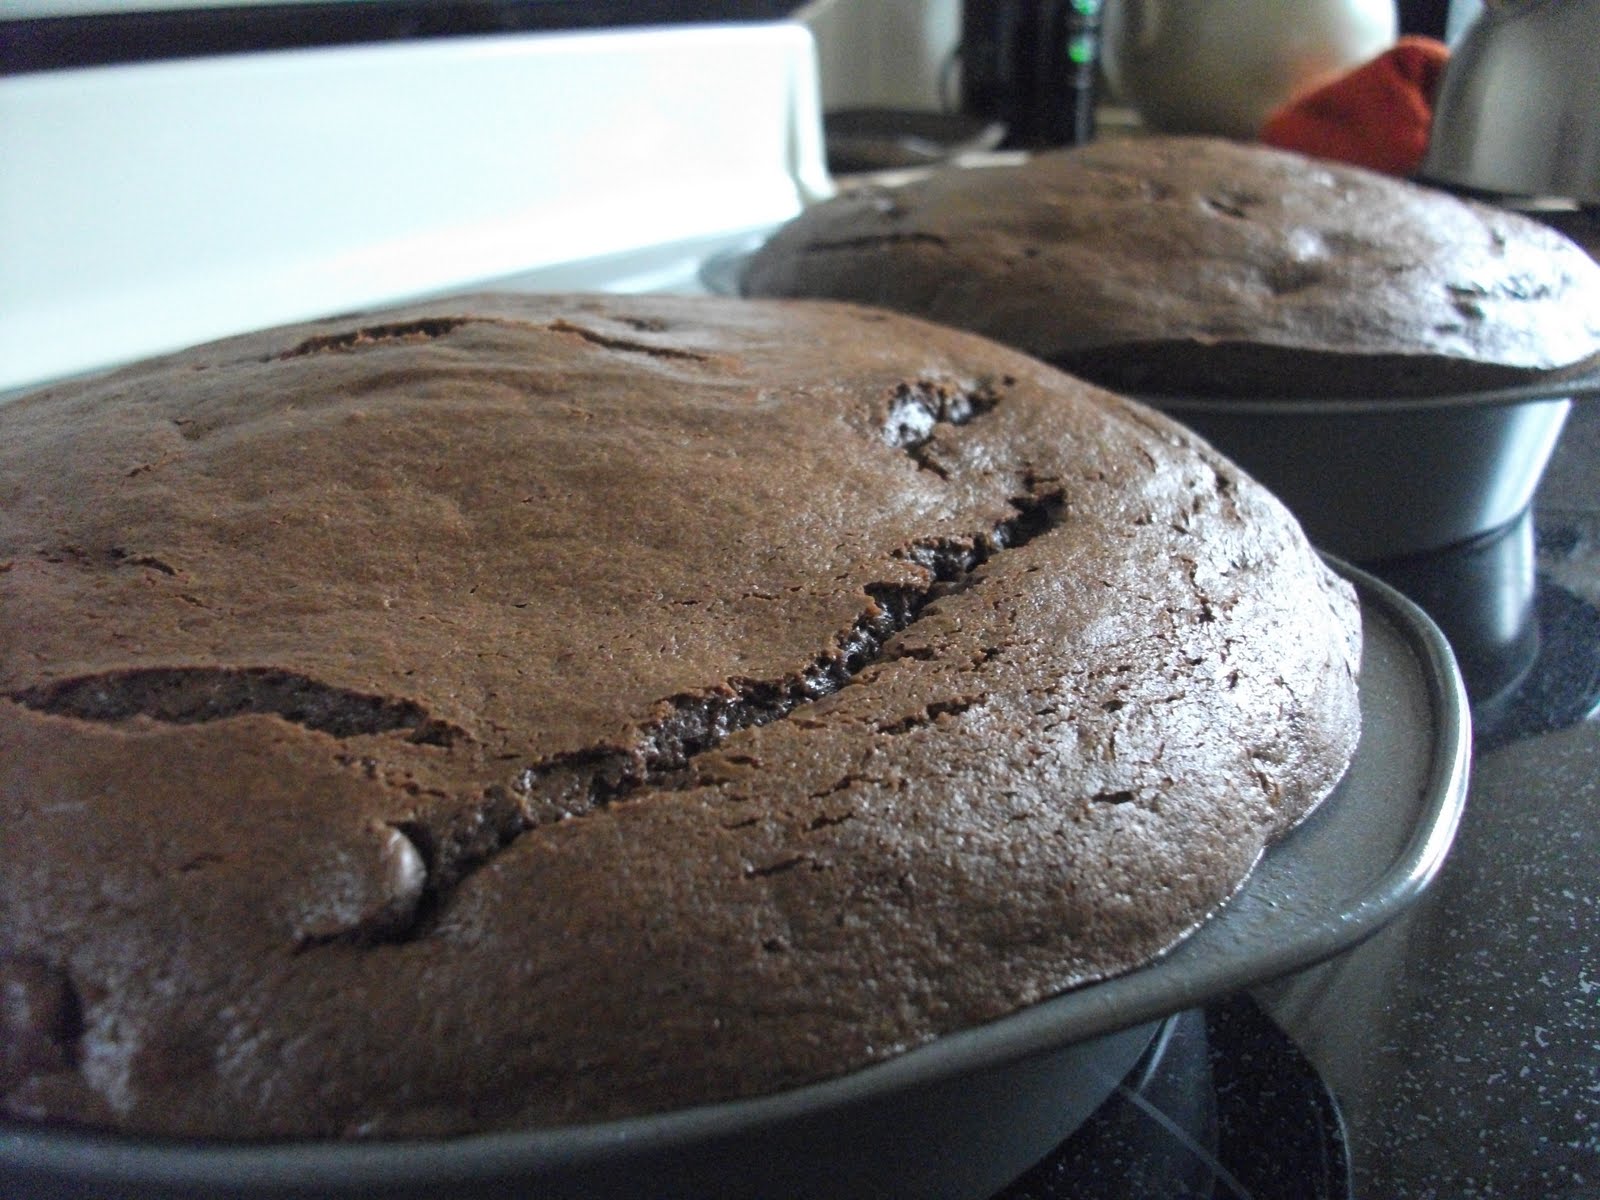
I followed the recipe and found the batter to be really rich and thick.  This was great as I was concerned that the chocolate chips might fall through a thinner batter.  This way, they will stay in the center and not sink to the bottom of the cake pan when baking. 


 One thing I recommend: weigh your cake pans as you fill them. 
 This ensures that you will have evenly sized layers.  


About this time, I was second guessing the "8-inch" pans that were suggested in the recipe. 
 Seems like an awful lot of batter to me...


Yup.  Next time I will bake in 9-inch pans.  This will prevent the "muffin top" look that you see above.  
 Now this is where I deviate from the recipe.  It says to leave cake "in the pans" for at least 30 minutes before transferring them to the cooling rack to cool completely.  Well... My experience is that this only leads to dry cake.  See, the cake continues to bake while it's in the pan.  This is fine if you're the kind of person who takes the cake out before it's really ready.  I personally only use the timer as a suggested guide, and instead let my nose tell me when it's finished baking.  This can be tricky, but the rule for me is:  When the first kid comes to me and says...

" MMMMmmm are you making cake??".. I have about 5 minutes before I need to take the cake out. ;)

I then immediately wrap the cake in overlapping layers of plastic wrap.  Yes, while it is still hot and steamy.  This seals in the heat and condenses the steam back into the cake, creating a moist cake no matter how much you've over baked it... well, within reason,  I mean c'mon, if you burn it... it's burnt.
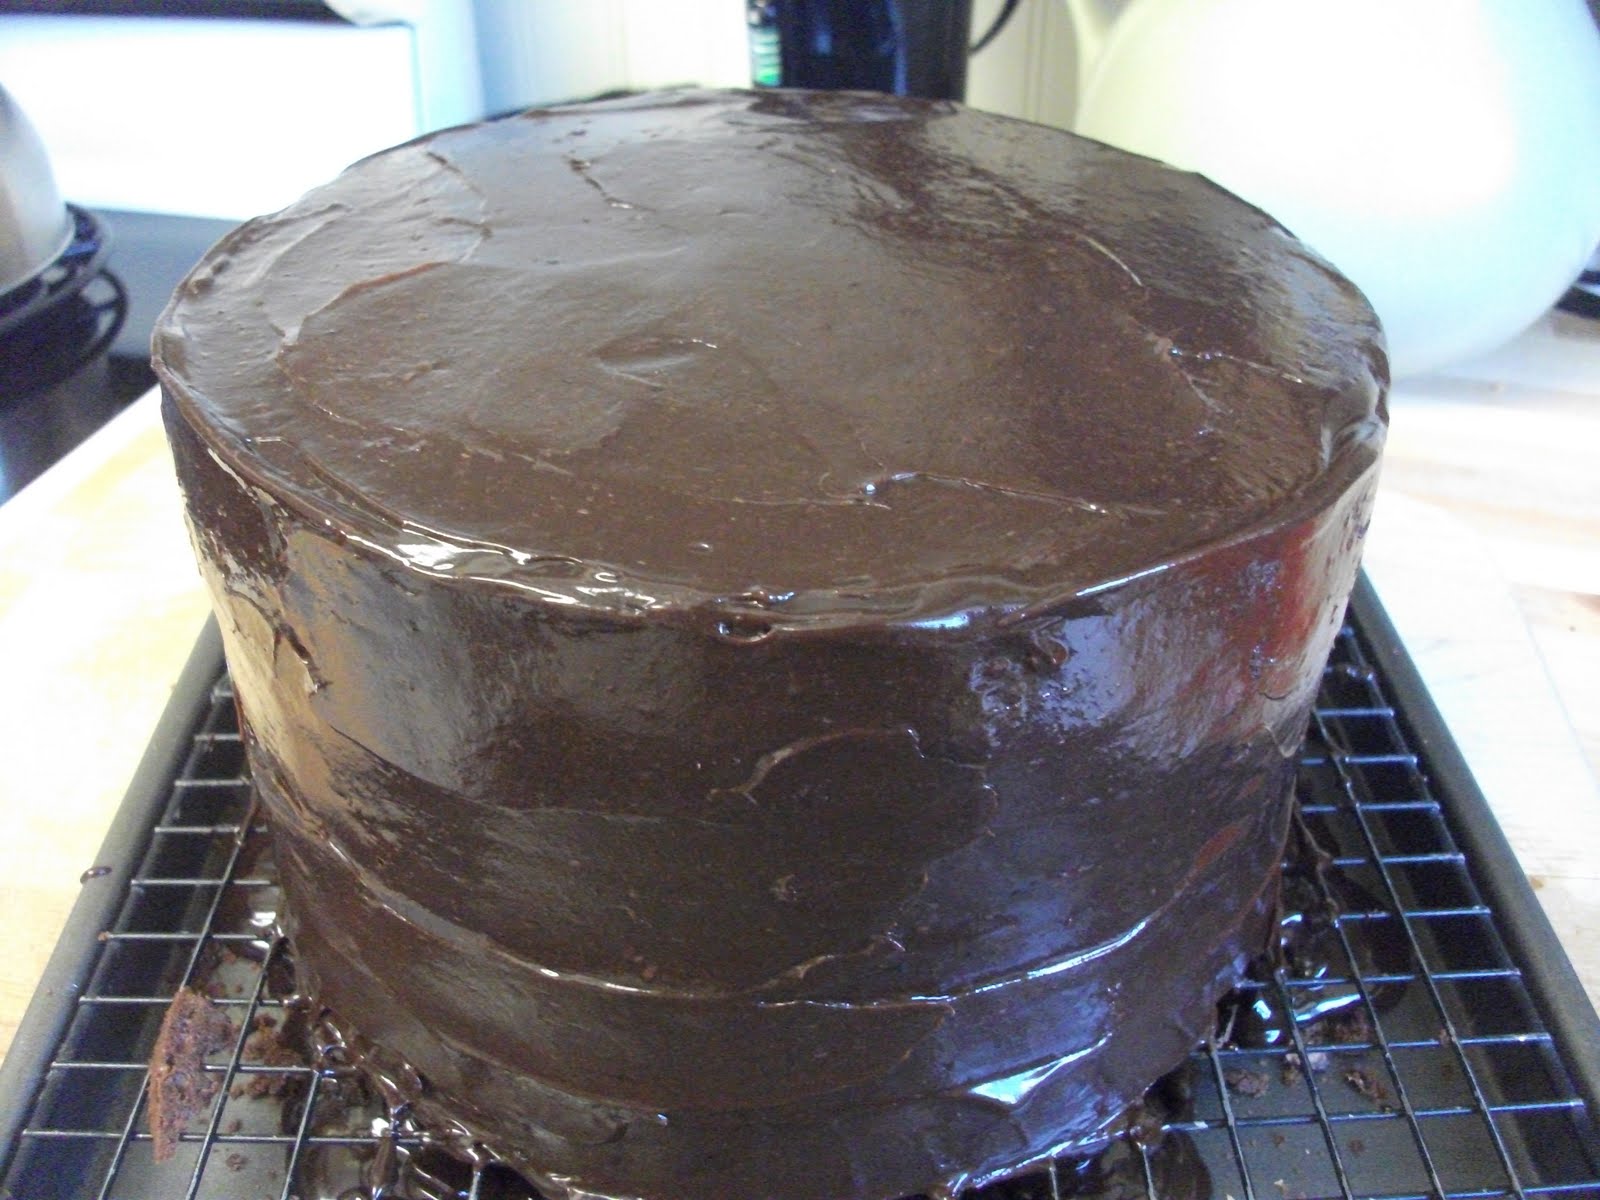
Next put both layers in the freezer.  Yes, the freezer.  Ever try to frost a fresh cake?  One word.  CRUMBY. For three years I worked in a bakery and learned a few tricks about decorating cakes.  First lesson. It's much easier to frost a frozen cake than a fresh one.  I like to make my cakes at least a day in advance.  
Before frosting, I needed to de-muffin my cakes.  I used a serrated knife and just cut off the cake that was sticking out to make two round layers.
I have never made, used, or eaten ganaache before... oh what I have been missing!!  I will use this easy peasy frosting again for sure!  The corn syrup gives it a beautiful shine that butter-cream, whipped cream, and fondant just can't give.  Plus, it's just plain YUMMO!

So because this was a cake for a friend's birthday, I didn't decorate the top with nuts like the blog suggests.  I mounded deep purple and lavender roses in the center and used chocolate butter-cream to decorate the edge.  


The cake is sitting on a piece of cardboard saved from a frozen pizza and covered in foil.
The doily is a paper doily that I get from walmart in the cake decorating section

My buttercream recipe for roses is extremely simple... in fact I don't even measure the ingredients out!
Powdered sugar
shortening
milk
rum flavoring
almond flavoring
I listed the ingredients in order of amount.  Obviously, you want more powdered sugar than anything... Say, half a bag?  About a 1/4-1/2 cup shortening and add the milk a tablespoon at a time, probably 3-4  You want this frosting to be a bit stiff if you're intending to use it for flowers.  The important ingredients are the flavorings.  They make all the difference.  Just a dab'll do ya!
I have to say, this was a very tasty cake and I will most definitely be making it again!!
Oh yea, and...
Happy Birthday, Sarah! ;)

Thursday, May 19, 2011

Braggin' on My Baggin'

Okay, I admit the title is lacking... but the bag makes up for it ;)

I found this free crochet pattern on ravelry.com by "Chocolate Mints In a Jar"... seriously, that is her screen name.  It is sooo cute and a very well written pattern. Find her craft blog here.  Find the pattern here

I started and finished this bag in two days... and it should have only taken one, but I FROGGED so many times.. ugh, it wasn't pretty. For anyone who might not know what "frogging" means to those of us in the yarn world:  What does a frog say?  "RIP IT, RIP IT, RIP IT"... so that's what we call pulling out several rows of stitches. Cute, no?... yeah, but not when it's happening.  First it was miscounting, then it was adding stitches instead of slip-stitching... then after I had frogged the bag to the base TWICE already, I realized how big of an impact one little four letter word has in a pattern.  TURN.  Ugh, I didn't turn after each round, I just stitched in a round...  That was why my count kept getting off.  Facepalm!

Well, I was about ready to croak when I discovered this huge mistake... but I decided instead of dissecting the bag, I would try to compensate for my mistake. I will explain how I did that on my ravelry.com account for anyone who might actually be interested.  But really, my advice is just to follow the pattern!

In the end, I really like the finished product.  Perfect or not, it will serve me well.  It's just the right size for a book or two, couple of magazines, a phone, some eyeglasses (for us aging folk).  It would also be great to put my Bible in for church on Sundays.

I'm happy with the color choice, and I think I'll make a couple more--the right way-- in different color combinations. ;)

If you'd like to find me on ravelry.com, my screen name is "Iowaycrochet" :)

Wednesday, May 18, 2011

My New Garden Cart

So for Mother's Day I usually get some great garden type gifts.  This year was no exception. It's no secret that I love to be in the garden, but I don't like having to dump my 4 cu. ft. cart a bajillion times a day.  Not too long ago I started researching carts for the garden that were a bit larger and more efficient than the one I currently have.  In the end my dear sweet honey, who isn't so fond of yard work, decided to get me the deluxe model (in my opinion) of a garden cart for mother's day.  It reminds me of the cart my dad uses, only his is even BIGGER!
So here are some pictures of my garden cart.  Some assembly required ;)
Everything came in that cardboard box.  I ordered this cart from Amazon.com and within the week, I had my cart.  Awesome!

The boards are plywood and the wheels are solid.  Yea! no worrying about blowing out a tire.

Yes, I'm one of those people who has to check all the hardware and parts to make sure nothing is missing.  My husband has influenced me greatly. :)

This is what is should look like...


Thank You!!
Here's who's gonna make it happen. 

So here it is posing in the "driveway garden".  You can see all my "stuff" that I can tote around now. 

My babies.  

Now we're talking.  With my other cart, this would have been two loads, easy.  But here you can see the new cart isn't even half full!
LOVE IT!

Tuesday, May 3, 2011

Is that red celery??? NO IT'S RHUBARB!

Sunday after church, I was blessed with a huge bag of rhubarb from a sweet lady in our congregation.  Three years ago, I had never seen nor eaten rhubarb before.  Oh boy, what I was missing!  The last two years upon receiving bundles of this "red celery", I would wash, chop and freeze it to use later.  Today, I decided to try making jam with it.  The first canning of the year!!

I have only started canning since moving to Iowa. Something about settling in the Midwest has caused the pioneer within to emerge.  I think it's quite ironic considering I lived in California's central valley, a.k.a.the produce capital of the world, and never once canned anything.  Oh what a waste!!  But no more.  As my teenage daughter might proclaim... I am a canning BEAST!

I had one hour to can my first batch before I needed to take Eric to piano lessons.  He of course valiantly offered to forgo his lessons as a sacrifice to help his dear mother... Sweet kid.  But I felt confident in my canning abilities and took on the challenge.

1. Canning jars and rims into the dishwasher... CHECK
2. Canning pot filled with water and put on a burner to boil... CHECK


3.  Rhubarb washed  and diced.... CHECK


4.  Strawberries washed and sliced... CHECK


5.  Lemon juice, masher, rolling boil... CHECK
6.  Pectin  THEN sugar (this step has killed me several times... I have a thing about putting the sugar in before the pectin and it ruins it!)... CHECK
7.  Ladle into hot jars, seal, and set into boiling water bath... CHECK
8.  Process 5-10 minutes... CHECK
9.  Remove from bath, and wait for POP... CHECK
10. Label and store... CHECK


--Set aside a jar for the sweet lady who brought me the rhubarb.... CHECK!!


Now, off to piano lessons.

Monday, May 2, 2011

Sesame Street beanies

"Sunny days sweepin' the ... clouds away... on my way... to where the air is clear!!"   Yes, I am a product of the 70's and a first generation Sesame streeter.  While I'm not always thrilled with the content these days on Sesame Street, I must confess, I still adore the little monster puppets.   I grew up hearing Cookie Monster's poor grammar and his even poorer dietary habits, and yet, I grew up just fine, sorta.  Anyway, one day I got a random inkling to make beanie hats that resembled some Sesame Street characters.

I started out crocheting a basic baby beanie using this pattern: Girl in the Air blog: Beanies  , but added a band of black at the end to resemble a mouth.  The first round is simply sc stitches, but on the the second pass of the band, I used a progression of sc, hdc, dc, stitches then reversed the pattern in order to make the mouth appear as though it were open. I ended with another round of sc stitches.


For the eyes I made (2) two-toned pompoms.  There are many techniques to making pompoms, however, my method was wrapping a square piece of cardboard about 3 inches wide with white yarn. Then I added black  yarn so it was half and half.  The more revolutions of yarn, the denser the pompom. I pulled the wad of yarn off the cardboard, carefully cinching the loops with my hand until I could tie a segment of yarn around the middle. With a my fabric scissors I cut the loops then shaped the black yarn down until it resembled an eye ball set against the white yarn.  I trimmed up the white yarn and attached the eyes to the beanie using thread and a needle.  Through trial and error, I found the eyes looked best down low to the brim, just resting above the "mouth".  Cookie Monsters eyes needed to have that crazed look, so one is slightly higher than the other.  One pupil is slightly smaller as well.  Elmo's nose is a simple single colored pompom.

I have others that I am making, but have gotten side tracked with other projects.  If you are a friend of mine on facebook, you might have seen my Zoe version in a photo shoot by my friend Jen Jensen of PS139Photography 

So this blog post was brought to you today by the colors blue and red and by the number 2.  Have a great day!