Tuesday, October 26, 2010

And... it's a wrap!

Okay, FINALLY the LAST page about my kitchen.  I must say, this project took longer than I planned, but the results were far better than I expected... so I won't complain!

The last couple of things I did were to make curtains for one window and fix up a shelf.

First the shelf.  I re-purposed an old wood shelf by priming it with a deep rust color spray paint, then lightly coating it with the same blackened bronze colored paint I used on the cabinet hinges. It turned out great.  Dan mounted it on my backsplash and tada!

my fabric for curtains
Secondly, I made curtains for the window.  I found pretty cheap fabric at a quilt shop just over the river.  I wanted something fresh and simple.  I went with a fairly small orange floral pattern on an off white background, and complimented it with a contrasting sage and tan plaid fabric.  I bought a yard of each.


  I spent a lot of time looking at different types of kitchen curtains and settled on a simple tie-up version.   Using the existing hardware, I just needed to hem the orange fabric, fold it in half and sew it together making a huge rectangle.  I left about an inch open at the top in order to slide the curtain rod through.


"Two lines over"
REAL technical sewing terms here.
 Next I made two ties out of the plaid fabric:  I cut the strips 5 inches wide and the entire width of the fabric (44"). With right sides together, I sewed up one of the short ends, and then up the long sides of the tie.  I'm not sure what width my seam was... I just lined it up with the second line on my sewing machine.  I'm thinking it was just a smidge over 1/4 inch. Next, I pressed the seam.   I left the second end open in order to turn the fabric.


To finish, I just folded in the un-sewn edge of the tie and stitched across it twice.  I did the same thing to the other end, just to make them match.


I draped the ties over the curtain rod and gathered the orange fabric up at the bottom.  I tied a knot with the ties and arranged the curtains.

Not bad!  It could use some steaming, but I'm pretty happy with how they turned out. :)

So FINALLY, the kitchen is finished.


...to This.
From This....

    
And from there...
...to here.


Before: The table and four chairs fit, but it made
accessing the built in hutch awkward.


We removed two chairs and now have more space to move.


Okay, so how cute is my cat?
Yes, I'm aware she's on the table, but that is HER window.


Now... about the bathroom...


Monday, October 25, 2010

Kitchen continued..

Pumpkins!
I've chosen to accent the kitchen with
shots of orange :)

We continued the beadboard from the breakfast nook into the kitchen as backsplash.  I love the simplicity of the beadboard up against the butcherblock counters.  I'm very pleased with how it came out.  Dan, painstakingly cut each peace and put it up for me, while I then used my cake decorator skills and sealed it all with silicone caulking.  We still want to add a small piece of trim where the beadboard meets the counter, but I have to say, it looks pretty good as is!   I gave the beadboard three coats of paint.  
I washed and painted the phone jack cover to match
the other plates I got at Home Depot.


The old florescent light.


The lighting was a bit of a headache.  I didn't like the florescent lights that were previously over the sink.  I envisioned two pendant lights hanging there, but this meant drilling two additional holes in order to space the lights correctly, not to mention another electrical box deally thing.... too much work.  I searched, searched, and searched some more on the internet for a solution.  Finally, I found the answer.  "Island lighting".  While this fixture is supposed to be positioned over an island, I decided it would work great over my sink.  It actually came with extension rods which would position the lamp at the right height from the ceiling... great, except I was using it over my sink, and didn't want to bang my head into the fixture. Consequently, we left ALL 
the extensions out and just mounted the fixture right to the ceiling above the sink.  SUCCESS!  

It is amazing what an updated light and a little paint can do!
  I so love this kitchen now.  It is amazing what updating a kitchen will do for your desire to cook!  Even the kids have commented on how much more I have been baking lately.  They love it.  So do I :)   My next post will show a few finishing touches, and then THE reveal!


Wednesday, October 20, 2010

Roomba review

For Christmas last year, I was given a Roomba iRobot 550 vacuum cleaner.  Mary Ann, as I have come to call her, is my new BFF.  She was given the name Mary Ann in reference to the maid whom the white rabbit screams for in the pages of "The Adventures of Alice in Wonderland".  MARY ANN!! OH, MARY ANN... you get the idea.

Mary Ann
I'm well aware that she's a luxury.   But if you think about it, so was the automatic dishwasher at one point in our country's history.  Now, you rarely see a home without one.  So this too, Mary Ann has become to me; indispensable.

With the push of a button she gingerly backs up out of her nesting spot to survey the work area.  She cheerfully dings her little starting song and sets off in her first direction.  Criss-crossing through the room, Mary Ann's only hesitation is when she comes in contact with the laser-beaming road block I've set up in advance.  Mary Ann is not only efficient... she's smart too.  Once she has touched the "no-no" light she makes note to cross it after she's duly done her duty in the currently occupied room.  After 25 minutes in one room, she is given programmed permission to cross the laser into the next room.  Around chairs, under sofas, teasing the cat with her spinning brush, Mary Ann is focused.  She's also mesmerizing.  I've found myself just standing watching to see if she's really going to come back and get that one spot she missed.... wait for it, wait for it... YES! SHE GOT IT.  She transitions from hardwood, to linoleum and back to carpet with ease.. which is good, because I have all three surfaces!   This is starting to sound like a commercial for the iRobot!
The No-No light

Mary Ann can be programmed to run at any time, at any schedule, but so far I have opted to simply push her buttons when I want a reaction... ironically, this is something I'm particularly good at.

But lately, Mary Ann has been sluggish.  She's singing her finished song after only 9 minutes of work.  She's not responding to her brush cleanings and can't even muster up enough energy to find her way back to her nesting spot.  I'm thinking she'll be hitting me up for a raise soon... or maybe she just needs a new battery.  Research I've read says she'll need a new one within a year.  Perhaps her new battery can be seen as a vacation, just the thing she needs to get back to work.  I suppose I can understand that. :)

Monday, October 18, 2010

The Pen is Mightier Than the Sword


 I love convenience and functionality.  I love good ideas.  WD-40 in a pen... now THAT's a good idea.

Ever go to the grocery store and you get THE cart.  The one that squeeks, squeals and shrieks as you push it through the store?  Yeah, me too.  One day, while shopping, I noticed the pen that would change all that for me.  WD-40 in a convenient push pen.  This thing is awesome.   A little push on the bolt of the wheel and presto...no more squeaky carts.   Of course it's great for other stuff like rusty sliding door screens and electric hair clippers.  


Here is a link to many more ideas:


300 uses for WD-40 no mess pen.


Thursday, October 7, 2010

My Dirty Little Secret


Buy Now Save Later!!!

Now is the time to buy dirt... cheap! 

I have a fairly large yard to keep up with and I'm constantly in need of new dirt.  But dirt ain't cheap, so I wait for a sale.  Last year around this time, I stumbled on $2.00 bags (1.5 cu.ft.)  of Organic Miracle Grow, which usually sells for $10.48/bag.  I think I bought about 10 bags and stored them on a pallet in my garage. I used it all btw. I wanted to get a similar deal this year, but waited a little too long.  So yesterday, I snatched up ten $3.00 bags (1.5 cu.ft.) of Miracle Grow gardeners mix.  There were only 15 bags left!  They are sitting in the back of my Jeep waiting to be hoisted to their winter spot on the empty pallet in my garage.  I can now rest all winter long knowing that come spring, I will be ready!  

I also make sure I have a couple bags of perilite (the little white balls that come in potting mixes) and sphagnum peat moss to mix in with the soil to give it an extra boost. :)  

Wednesday, October 6, 2010

A Chip Off the Ol' Butcherblock and even the Kitchen Sink

Before: left side
By far, the most difficult part of our little reno project was installing the counters and sink.  Which, by the way, is why we enlisted the expert help of a good friend and board of trustee member.  Thanks Jay!!

Before: right side
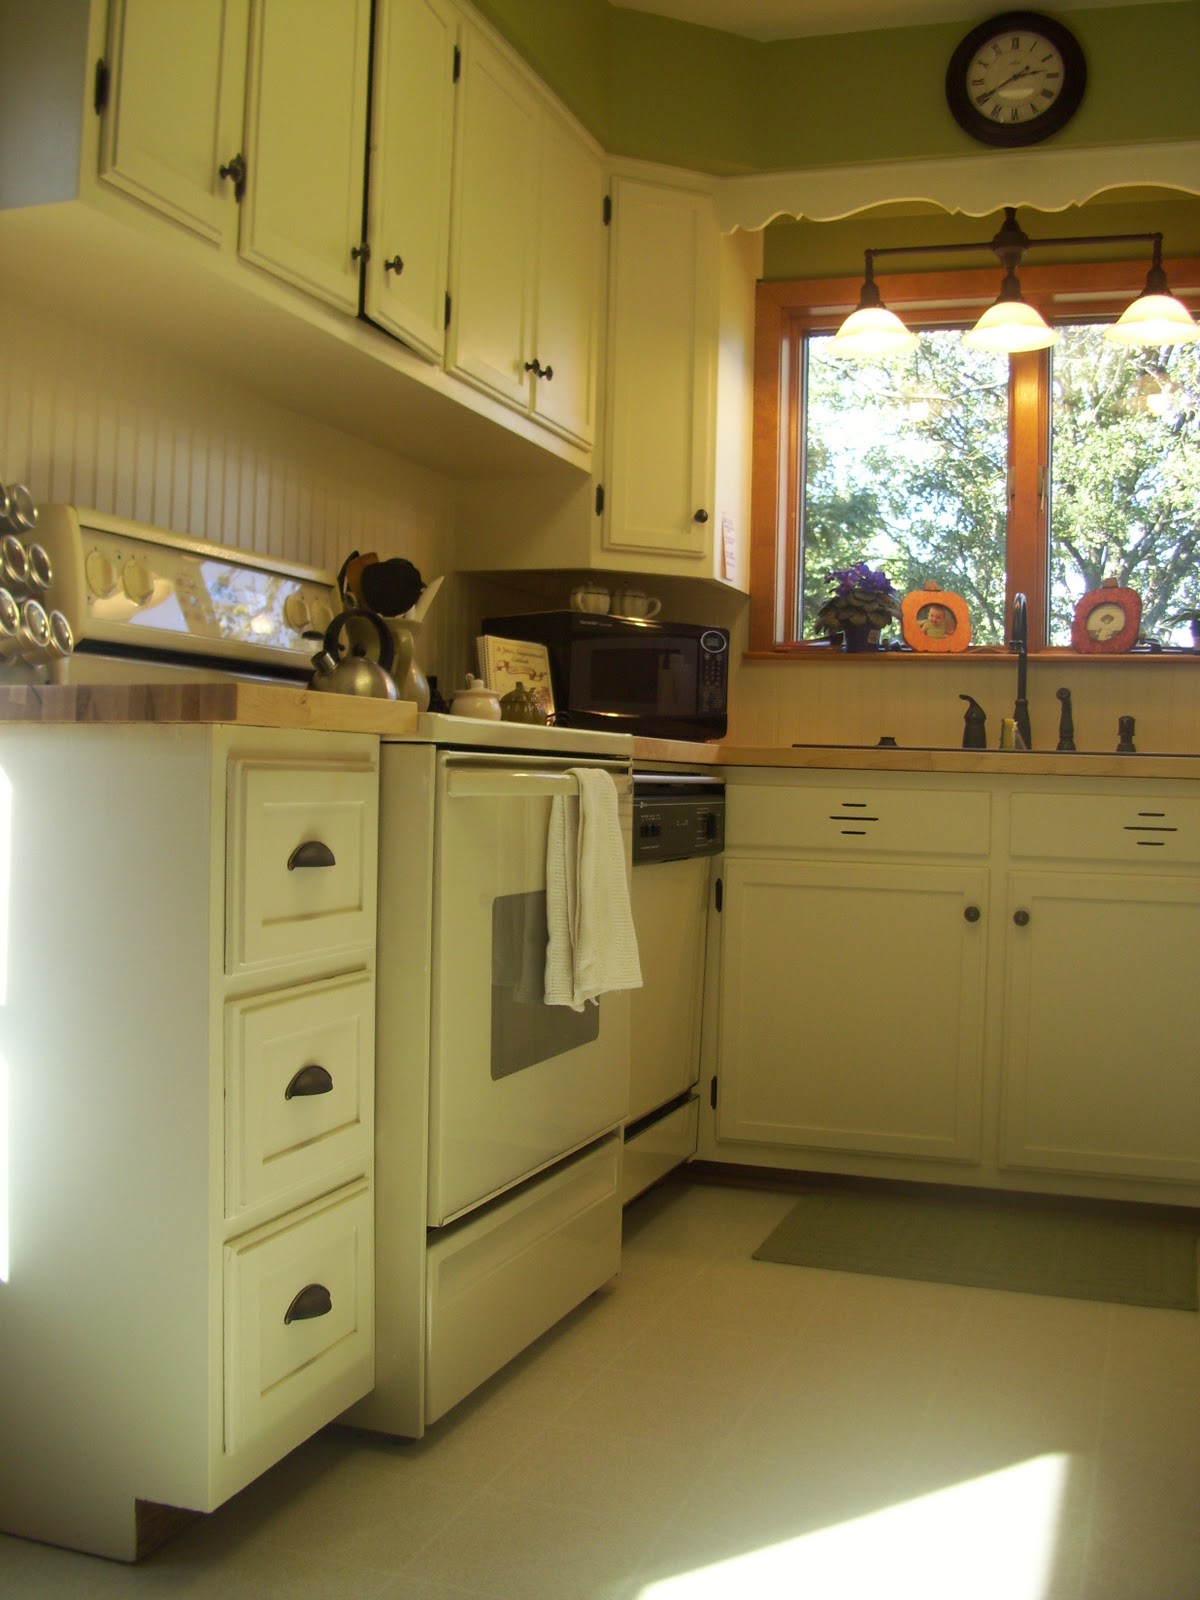
Why we chose butcherblock:  How ridiculous would it be for me to go grocery shopping at Walmart wearing Versace and diamonds? (Yeah, cause I own either...:::smirk:::)  That's how I felt about putting granite in our little country kitchen.  It just doesn't seem appropriate.  I wanted something that said, "Hello, I'm a friendly little kitchen, and I will work really hard to make sure your dinners are yummy for your family."  Yes, my house speaks to me. :)  Oh, that, and the fact that granite's way out of our budget.  Still, I have to say, I LOVE the butcherblock.
Maple Butcherblock


Where we got the butcherblock:  Well, I did a lot...and I mean a LOT of research on the internet about butcherblock.  How to install, where to buy, how to care for ... etc.  It came down to two choices.  IKEA makes a good looking butcherblock counter that seems to work really well for most people.  It's slightly thinner (1 1/4" vs. 1 1/2" )  and the nearest store is in Chicago.  Or for slightly more money (really, just pennies considering the gas to Chicago), we could go to Lumber Liquidators in Davenport and get the 1 1/2" thick maple.  Done deal.  We figured we would need two 8' slabs to do the entire kitchen.  I told you it was small.


Old counters removed
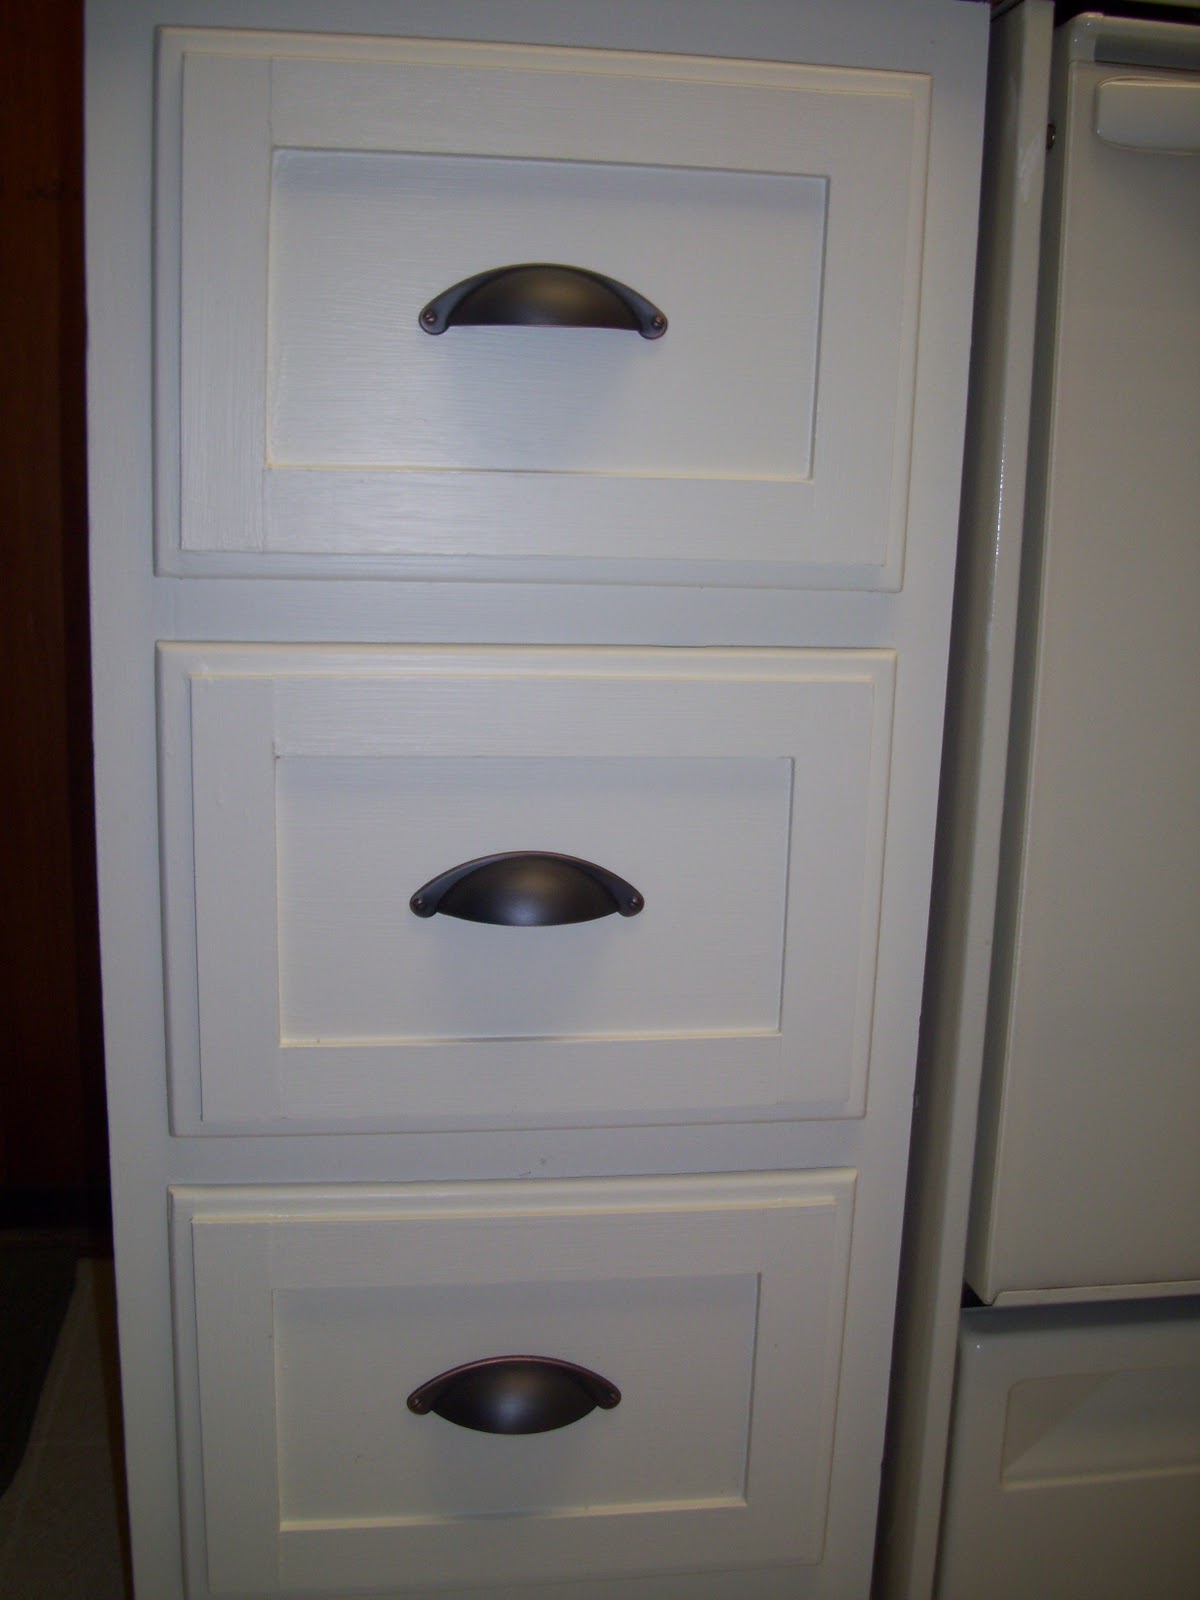
How "we" installed the butcherblock:  Yeah.  All I can say, is that every parsonage should be so blessed as to have a trustee like Jay.  The man is meticulous at his work.  And although he's more familiar with flooring, he's just as fantastic with counters.  There were no shortcuts taken in installing our counters.  He sanded, sanded and sanded some more... he tongue and grooved for a perfect fit, he basically treated our humble little kitchen like it was to service kings and queens.  He sacrificially spent ALL day away from his family in order to put my kitchen together.  We so appreciate it!
No mitering here.  The sink piece was tongue and grooved
with the edge pieces creating a very snug fit. 


Waterlox... on half.  
How we care for the butcherblock:  After the installation, I sanded the entire surface of the butcherblock with a fine grade sandpaper, wiped the dust away and applied the first coat of sealant.  Consistently, my research concluded with Waterlox being voted as THEE best sealant for butcherblock counters.  Over and over and over again, it was praised as the 
most popular choice.  How could I argue with that?  The only problem... I couldn't find the stuff anywhere!  I ended up just ordering it over the internet from the Waterlox site.  I liberally applied three coats, waiting 24 hours between each coat for drying.  With each pass, the counters became richer in color. I was getting pretty excited.


As for the sink, I threw caution... and budget... into the wind.  I tried, seriously, I did try to want a stainless steel sink.  Truly.  But it just wasn't happening.  My first wish was an apron farmhouse sink, but the dishwasher door made it impossible to have a sink that stuck out any farther than the cabinets, so that was a no-go.  After a few days of mourning the death of my dream, I tried to suck it up and envision a common stainless steel sink... Just wasn't happening.  On a trip to Home Depot I found it.  An espresso-colored, granite/resin composite sink.  Such a thing of beauty.  Rejuvenated hope. (dramatic much?)

Granite composite sink and new faucet
Our personal superhero...  His face is shielded in order
to protect his secret identity.


Jay continued his ministry to our parsonage kitchen by installing the sink AND the disposal.  I even have a little button on the sink that activates the disposal.  So cool.  


 So we are getting closer to finishing.  Still to come:  Backsplash, lighting, and finishing touches!!  I'd better get working on those curtains!

Tuesday, October 5, 2010

Cabinets

So the next thing we managed to do was paint the cabinets.  I spent quite a long time researching just how to do this, so as not to make a complete mess out of the cabinets.  The process started with, removing old hardware.  Then there was a good cleaning, a light sanding to rough up the glossiness, and next I painstakingly applied 2 coats of primer.  Being sure to sand between coats.

One thing I knew I wanted to do was to modify the cabinet doors somehow.  I searched pictures of kitchen cabinets on the internet and found that a simple framing element would drastically improve the look of the kitchen.  I especially liked what is called the "shaker" look.  Because the cabinet doors were ever so slightly beveled at the edges, we decided it would be better to set the frame in a 1/2 an inch or so.  They turned out better than I could have imagined.  Three coats of paint went onto the cabinets with sanding in between. 


I think my favorite part of this whole project was watching Dan with his step-dad and our son all working together out of our garage.  The saw dust, nails, light hearted banter and careful instruction all reminded me of the millions of times I "helped" my dad work on any given project when I was a kid.  I learned so much from him those days in the garage.

While the boys went to work on the frames for the doors, my mother in law and I started in on the hardware.  We buffed up the shiny chrome with some sandpaper, then applied a spray primer in a rust color.  The final coat of blackened bronze paint would be applied next.  I forget where I saw it, but some smart blogger put the itty bitty screws into  styrofoam and sprayed the heads of them without so much as a splatter of paint on herself.  This was an idea worthy of stealing!


I chose the blackened bronze finish for the pulls and knobs, switch plates and hinges, because it gives the house a more updated look. While I did purchase new knobs and pulls, I reused the hinges, saving a small fortune!

Next, the counters and the sink!  Stay tuned!!

Monday, October 4, 2010

In the beginning

Our Kitchen: BEFORE
   Okay, several... months... ago, I embarked on a kitchen renovation project.  Well, "renovation" might be a bit lofty for what we really did.  How about we call it... kitchen "improvement" project?  Have you ever read the book, "If You Give a Mouse a Cookie"?  The mouse just keeps wanting more, and more things... Well, that's about how it all began.  Only my rendition of the book is called, "If You Give Your Wife a Disposal." The intention was to install a disposal in the parsonage, however, it was suggested that if we wanted to change out the sink as well, now would be the best opportunity to do it. But if you're going to go to those lengths, why not take out the counters as well?  And of course with new counters the backsplash will need to come out, which then only makes sense to refinish the cabinets.  Then you'll certainly want to be able to see the fruits of your labor... so we should install new lighting!!  And so it went.

It is difficult to see, but there is wall-
paper up on all the walls.


I began with the stripping of wallpaper.
 The 80s gave us Madonna, shoulder pads, mullets... and wallpaper. Suffice to say, not everything done in the 80s was a good idea.  With the help of a friend I got the kitchen stripped down to its plaster walls.  Picking a paint color wasn't much of a task for me.  I knew I wanted green, but what shade?  My mom painted an incredible watercolor that I envisioned hanging in my dining room, which is connected to the kitchen, so I went with a shade that would compliment that.  The color is called "Herb Tea", but c'mon, we all know it's just a vamped up version of that wonderful 70's classic "Avacado".
Here's a photo of the watercolor my mom did... the inspiration
for my paint color.
This is a poor representation of the
actually color we used...oh well.


Here's a better shot showing the wall color.  This is Sam.
Sam can do anything.    
After the wallpaper was gone, and color went up, we enlisted the help of family to install the beadboard.  The travelling team of Grandma and Grandpa Gamboe arrived in July, and we immediately set them to work.  So much measuring, cutting, gluing, and nailing!  Then puttying, caulking and painting.  The kitchen was starting to take on a new look.

Ahhh, so pretty.
The beadboard was chosen not only because it's an economic choice, but because it gives a simple, homey feel to the kitchen.  It's a style that will last through fads and fashion; a timeless foundation.  Accessories then become the changeable bookmark of time.  And when you need to revamp or bring a room up to date, you're not completely redoing it, you're simply changing out the accessories. The outlet covers, wall hangings, light fixtures, and rugs are easy to upgrade.


The finished product.
So this was just the beginning... That same week we tackled the cabinets.  I am so thankful for family members who know a thing or two about geometry and powertools!  More to come in other posts.  :)